prometheus-operator 的使用与设计
Contents
什么是 prometheus-operator
其实 prometheus-operator 诞生得非常早,当年大家都还在如火如荼地将业务推上 K8s 的时候,prometheus-operator 就已经被广为人知,并一度作为 Operator 模式的开发典范。发展至今,prometheus-operator 所定义的 CRD 则成为了 Prometheus 生态的事实标准。
prometheus-operator 的主要作用:让服务利用 Prometheus 监控变得 K8s 化。用户只需要通过编写 prometheus-operator 所定义的 CR 就能实现 Prometheus 的部署以及服务的监控和告警。
之前光顾着使用 prometheus-operator,并没有特别了解其内部的实现机制,本文就粗线条地就此做点笔记。
部署与使用
备注:大多数用户在生产环境中部署 Prometheus 全家桶都比较喜欢使用 kube-prometheus-stack,这个 chart 比较臃肿,不是特别喜欢,本文就换一种更直接简单的方式。
部署 prometheus-operator
参考自 prometheus-operator.dev,我们采用最直接的 YAML 来进行部署:
|
|
以上操作将会在部署:
-
prometheus-operator 所必须的 CRDs:
1 2 3 4 5 6 7 8 9 10alertmanagerconfigs.monitoring.coreos.com 2024-08-08T07:08:18Z alertmanagers.monitoring.coreos.com 2024-08-08T07:08:35Z podmonitors.monitoring.coreos.com 2024-08-08T07:08:18Z probes.monitoring.coreos.com 2024-08-08T07:08:18Z prometheusagents.monitoring.coreos.com 2024-08-08T07:08:36Z prometheuses.monitoring.coreos.com 2024-08-08T07:08:36Z prometheusrules.monitoring.coreos.com 2024-08-08T07:08:19Z scrapeconfigs.monitoring.coreos.com 2024-08-08T07:08:19Z servicemonitors.monitoring.coreos.com 2024-08-08T07:08:19Z thanosrulers.monitoring.coreos.com 2024-08-08T07:08:37Z我们实际使用的时候重点关注
prometheuses/servicemonitors/podmonitors。 -
prometheus-operator 服务:
-
定义 ClusterRole 和 ClusterRoleBinding 来定义 ServiceAccount 所需的 Cluster 层 RBAC;
-
在 prometheus-operator 所在的 namespace 中定义了一个 ServiceAccount 用以关联相应的 ClusterRole;
-
定义 prometheus-operator 的 Deployments 并暴露一个 Service 来暴露 Metrics;
-
开启监控
部署 Prometheus
我们需要使用 prometheuses CR 来部署 Prometheus 服务,如下所示:
|
|
上面的 YAML 表达的是:
-
定义了 ClusterRole / ClusterRoleBinding / ServiceAccount 来赋予 Prometheus 实例读取 K8s 集群资源的权限,用于 Prometheus 的服务发现;
-
用
prometheusesCR 定义了一个单实例 Prometheus(底层以 StatefulSet 运行),这里要注意:-
serviceMonitorSelector定义了必须有team=frontendlabel 的 ServiceMonitor 才会被这个 Prometheus 实例抓取数据; -
podMonitorSelector定义了必须有team=frontendlabel 的 PodMonitor 才会被这个 Prometheus 实例抓取数据;
-
部署 Example App 和 ServiceMonitor
部署一个 example-app 的 Deployment 和相应的 Service(每一个 Pod 的 <ip>:8080/metrics 都是采集点):
|
|
接着使用 ServiceMonitor 来开启监控(注意 metadata 上必须加上 team=frontend):
|
|
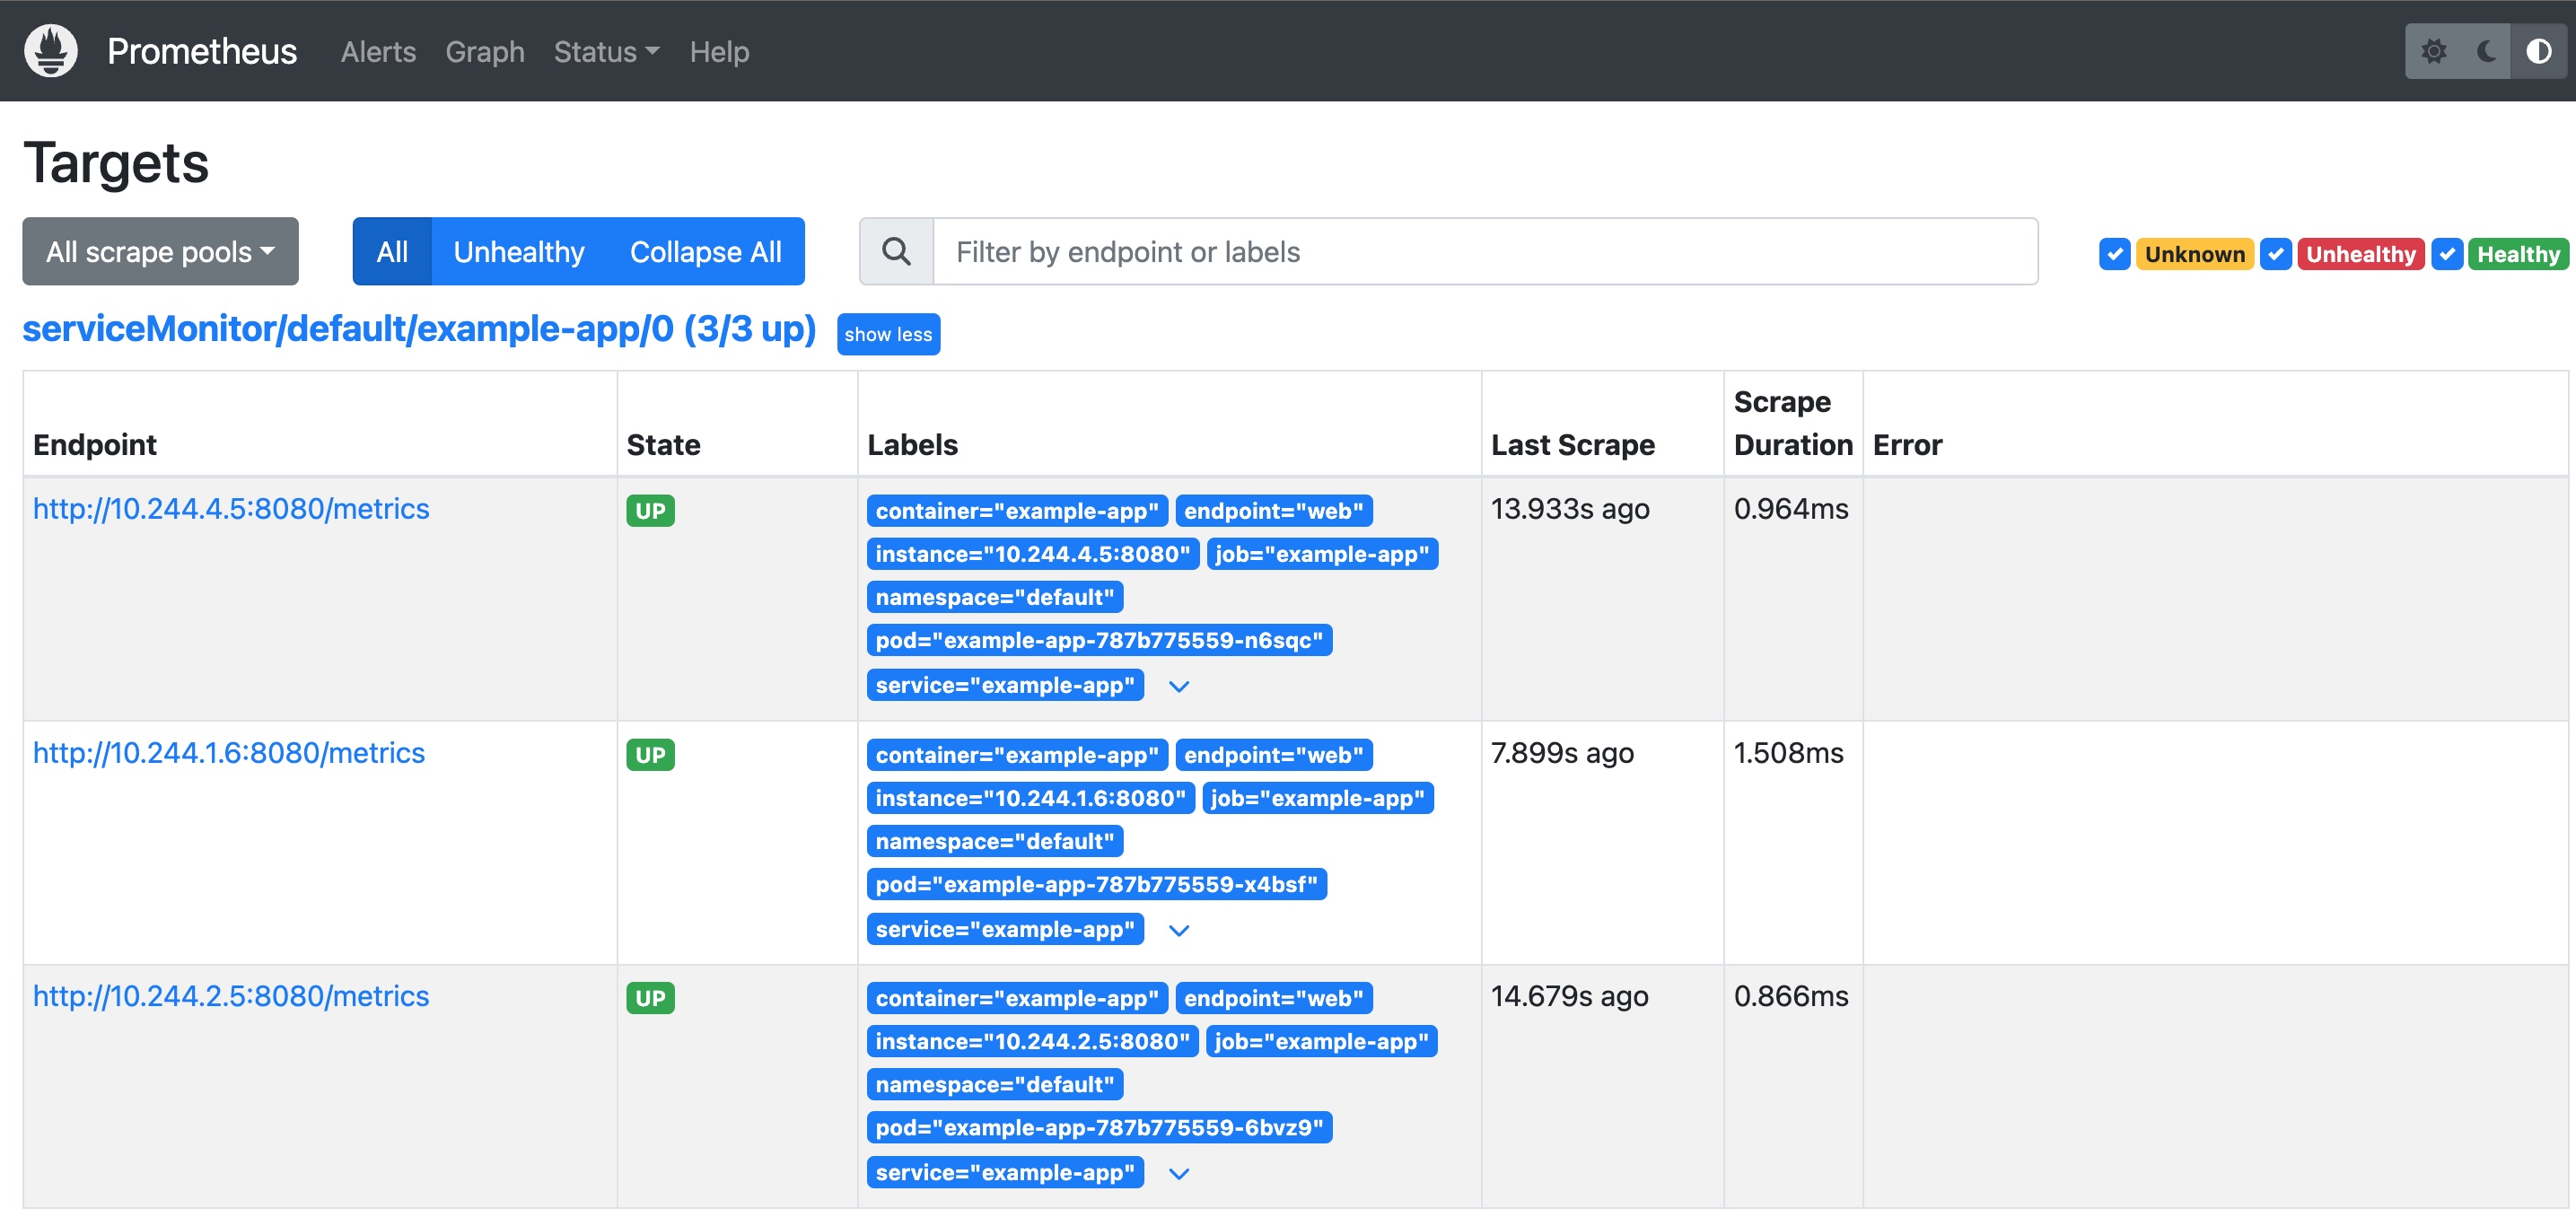
此时我们可以观察 Prometheus 的 WebUI( kubectl port-forward svc/prometheus-operated 9090:9090),即可以发现已经有被监控的 3 个实例:

其实我们还可以通过观察 Promtheus 的配置文件来发现监控是否生效:
|
|
可以观察到出现了名为 serviceMonitor/default/example-app/0 的 Scrape Job。
ServiceMonitor 和 PodMonitor 的选择
上面的例子同样可以用 PodMonitor,效果是等价的:
|
|
一般而言:
- ServiceMonitor 用于监控对应 Service 背后的 Pod 的 Metrics,比较适合被监控 Pod 有一致的 Service 的场景;
- PodMonitor 用于监控对应 Labels 下背后 Pod 的 Metrics,比较适合被监控 Pod 没有 Service 且多个 Pod 部署规则并不统一的场景;
* 部署 Grafana
我们还可以部署 Grafana 来做更多可视化看板:
-
添加 chart 源
1 2helm repo add grafana https://grafana.github.io/helm-charts helm repo update -
部署 Grafana
1 2 3 4 5helm upgrade \ --install grafana grafana/grafana \ --set image.registry=docker.io \ --create-namespace \ -n grafana -
获取默认的 admin 密码
1 2 3kubectl get secret \ -n grafana grafana \ -o jsonpath="{.data.admin-password}" | base64 --decode ; echo
基本设计
prometheus-operator 的控制链路其实非常简单,我们只需要知道以下基本原理就行:
- PodMonitor 和 ServiceMonitor 最终是用于生成 Prometheus 配置文件中的
srape_config; - Prometheus 可以使用一个 HTTP Post 请求
/-/reload来在运行时重新加载配置文件使新的scrape_config生效;
以上文为例,prometheus-operator 的控制链路是:
-
Prometheus / PrometheusAgent
prometheus-operator 监听 Promtheus 资源,当有 Add Event 发生时,prometheus-operator 将以 StatefulSet 的形式部署 Prometheus 实例。每一个 Prometheus Pod 里有两个容器:
-
prometheus容器:主容器,使用/etc/prometheus/config_out/prometheus.env.yaml作为主要的配置文件:1 2 3... - --config.file=/etc/prometheus/config_out/prometheus.env.yaml ... -
prometheus-config-reloader容器:辅助容器,用于监听上游配置文件的变化并调用主容器的 reload 接口重新加载配置;
当我们观察这个 Pod 的 volumes 时候,有两个 volume 可以重点关注:
1 2 3 4 5 6 7 8 9 10... volumes: - name: config secret: defaultMode: 420 secretName: prom-agent-prometheus-agent - name: config-out emptyDir: medium: Memory ...-
config-out:EmptyDir 类型的卷,主要是用于prometheus容器与prometheus-config-reloader容器的数据共享,同时挂载于两个容器的/etc/prometheus/config_out/中; -
config:底层是一个 Secret,这个config将被挂载为prometheus-config-reloader容器中的/etc/prometheus/config/prometheus.yaml.gz。prometheus-config-reloader会监听这个文件的变化,一旦有变化,将基于新的文件内容生成新的配置文件/etc/prometheus/config_out/prometheus.env.yaml。prometheus-config-reloader将调用主容器的 reload API 来重新加载配置文件;
-
-
PodMonitor / ServiceMonitor
prometheus-operator 监听 PodMonitor 和 ServiceMonitor 的变化。一旦对应资源发生了变化,prometheus-operator 将基于新的资源生成新的配置文件并将其更新到对应的 Secrets 中。由于对应 Secrets 以文件形式挂载于
prometheus-config-reloader容器中并被监听文件变化,所以当底层 Secrets 发生了变化,kubelet 将分钟级传播变化到对应容器内部,从而触发prometheus-config-reloader容器内的监听逻辑。Secrets 内部是一个 Base64 之后的 gz 格式的
prometheus.yaml,比如我们可以用下面这种方式解码出prometheus.yaml:1kubectl get secrets prom-agent-prometheus-agent -o jsonpath="{.data.prometheus\.yaml\.gz}" | base64 -d | gzip -d > prometheus.yaml
Prometheus Agent Mode
为什么需要 Prometheus Agent
Prometheus Agent 其实只是 Prometheus 的一种特殊运行状态,在 prometheus-operator 中以 PrometheusAgent 这个 CRD 体现,但其内部控制逻辑与 Prometheus CRD 一致。
之所以需要 Prometheus Agent,我们其实可以从 Prometheus 的这篇博客一窥究竟。Prometheus Agent 本质上就是将时序数据库能力从 Prometheus 中剥离,并优化 Remote Write 性能,从而让其成为了一个支持 Prometheus 采集语义的高性能 Agent。这样一来,Prometheus Agent 还可以部署在一些资源受限的边缘场景进行数据采集。
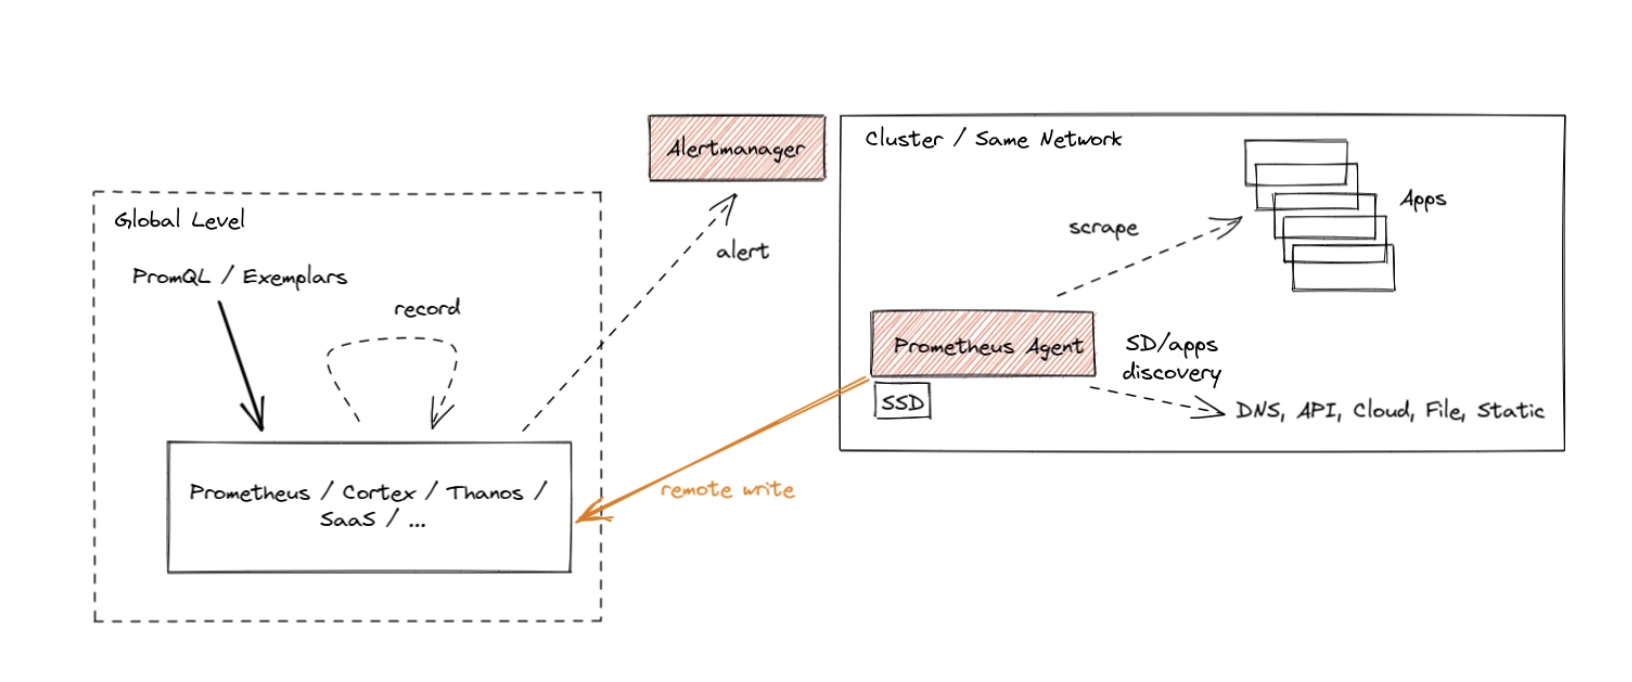
“众所周知”,Prometheus 作为数据库而言,查询性能和可扩展性相对较弱,这也是为什么 Remote Write 会如此流行以至于又成为了一个事实上的标准:因为大家都希望将数据转存在性能更高的数据库上但又希望继续兼容 Prometheus 的采集逻辑(因为很好用)。Agent 模式其实如大家所意,禁用了查询、报警和本地存储功能,并用了一个特殊的 TSDB WAL 来临时存储数据,从而整体架构如下所示:

这种架构某种程度是推拉结合的模式。Metrics 的采集采用 Pull 模式,而其存储则采用 Push 模式。对于高吞吐的写入,Push 模式其实对写入更友好。因为我们总是可以以 Batch 模式来集中向远端写入大批数据。这种模式下的 Prometheus 其实是无状态,更便于部署和 Scrape Job 的分片。
其实,这类兼容 Prometheus 采集语义的 Agent 社区有不少可供选择,比如 vmagent 和 vector。VictoriaMetrics 还曾经对 Prometheus Agent, vmagant 和 Grafana Agant 做过一个性能报告。不过很快,Grafana Agent 就停止开发并转成维护模式。Grafana 又造了另一个项目 Alloy,重点支持 OpenTelemetry,当然又造了一个与 Terraform 语法酷似的配置语言的 DSL。
从长期技术演技来看,Agent 总是兵家必争之地,因为守住数据入口可以做的事情比较多。大家总是希望 Agent 能:
- 具有极低的 CPU 和 Memory footprint,因为它们通常会以 sidecar 或者 daemonset 的形式进行部署,资源极度受限;
- 兼容更多的前端采集协议和后端写入逻辑;
- 具备一定的数据的编排能力(或者称为 pipeline ?),即采集后的数据能以一定的规则进行改写和转换;
- 技术中立;
感觉这块也有不少东西可以聊的,后面可以找时间再分析分析。
与 GreptimeDB 的集成
GreptimeDB 作为一个新款的开源 TSDB 很早就支持了 Prometheus Remote Write。我们其实可以直接使用 PrometheusAgent 这个 CRD 来定义基于 GreptimeDB Remote Write 的 Prometheus Agent。这样以来,用户其实无需做过多 CR 的改动就能直接将数据接入到 GreptimeDB 中。
-
1 2 3 4 5 6 7 8helm repo add greptime https://greptimeteam.github.io/helm-charts/ helm repo update helm upgrade \ --install \ --create-namespace \ greptimedb-operator greptime/greptimedb-operator \ -n greptimedb-admingreptimedb-operator 同时支持管理 GreptimeDB Standalone 和 Cluster 模式,用户可以根据自己需要创建相应的 CR。
-
快速启动一个 Standalone 模式下的 GreptimeDB
1 2 3 4 5 6 7 8 9apiVersion: greptime.io/v1alpha1 kind: GreptimeDBStandalone metadata: name: my-greptimedb namespace: default spec: base: main: image: greptime/greptimedb:latest我们可以通过观察
GreptimeDBStandalone的状态来判断其是否启动成功:1 2 3$ kubectl get gts my-greptimedb NAME PHASE VERSION AGE my-greptimedb Running latest 21s -
创建 Promethus Agent 实例并将 Remote Write 设置为 GreptimeDB
步骤 2 中创建的 Standalone 模式的 GreptimeDB 模式将暴露名为
${dbname}-standalone.${namespace}的 Service,由此我们可以确定其 Remote Write 的 URL 为http://my-greptimedb-frontend.default:4000/v1/prometheus/write?db=public1 2 3 4 5 6 7 8 9 10 11 12 13 14 15 16 17 18 19 20 21 22 23 24 25 26 27 28 29 30 31 32 33 34 35 36 37 38 39 40 41 42 43 44 45 46 47 48 49 50 51 52 53 54 55 56 57 58 59 60 61apiVersion: v1 kind: ServiceAccount metadata: name: prometheus-agent --- apiVersion: rbac.authorization.k8s.io/v1 kind: ClusterRole metadata: name: prometheus-agent rules: - apiGroups: [""] resources: - nodes - nodes/metrics - services - endpoints - pods verbs: ["get", "list", "watch"] - apiGroups: [""] resources: - configmaps verbs: ["get"] - apiGroups: - discovery.k8s.io resources: - endpointslices verbs: ["get", "list", "watch"] - apiGroups: - networking.k8s.io resources: - ingresses verbs: ["get", "list", "watch"] - nonResourceURLs: ["/metrics"] verbs: ["get"] --- apiVersion: rbac.authorization.k8s.io/v1 kind: ClusterRoleBinding metadata: name: prometheus-agent roleRef: apiGroup: rbac.authorization.k8s.io kind: ClusterRole name: prometheus-agent subjects: - kind: ServiceAccount name: prometheus-agent namespace: default --- apiVersion: monitoring.coreos.com/v1alpha1 kind: PrometheusAgent metadata: name: prometheus-agent spec: image: quay.io/prometheus/prometheus:v2.53.0 replicas: 1 serviceAccountName: prometheus-agent remoteWrite: - url: http://my-greptimedb-frontend.default:4000/v1/prometheus/write?db=public serviceMonitorSelector: matchLabels: team: frontend -
继续保持上文中的 Example App,让我们用 MySQL 协议查看数据是否成功写入
先用
kubectl port-forward命令打开4002的 MySQL 协议端口:1kubectl -n default port-forward svc/my-greptimedb-standalone 4002:4002使用 MySQL 协议进行连接查看数据:
1 2 3 4 5 6 7 8 9 10 11 12 13 14 15 16 17 18 19 20 21 22 23 24 25 26 27 28 29 30 31mysql> show tables; +---------------------------------------+ | Tables | +---------------------------------------+ | greptime_physical_table | | numbers | | scrape_duration_seconds | | scrape_samples_post_metric_relabeling | | scrape_samples_scraped | | scrape_series_added | | up | | version | +---------------------------------------+ 8 rows in set (0.01 sec) mysql> select * from version limit 10; +-------------+----------+----------------------------+----------------+-----------------+-------------+-----------+------------------------------+--------------------------+-------------------------------+-------------+---------+ | container | endpoint | greptime_timestamp | greptime_value | instance | job | namespace | pod | prometheus | prometheus_replica | service | version | +-------------+----------+----------------------------+----------------+-----------------+-------------+-----------+------------------------------+--------------------------+-------------------------------+-------------+---------+ | example-app | web | 2024-08-11 13:51:11.897000 | 1 | 10.244.1.6:8080 | example-app | default | example-app-787b775559-x4bsf | default/prometheus-agent | prom-agent-prometheus-agent-0 | example-app | v0.5.0 | | example-app | web | 2024-08-11 13:51:41.897000 | 1 | 10.244.1.6:8080 | example-app | default | example-app-787b775559-x4bsf | default/prometheus-agent | prom-agent-prometheus-agent-0 | example-app | v0.5.0 | | example-app | web | 2024-08-11 13:52:11.897000 | 1 | 10.244.1.6:8080 | example-app | default | example-app-787b775559-x4bsf | default/prometheus-agent | prom-agent-prometheus-agent-0 | example-app | v0.5.0 | | example-app | web | 2024-08-11 13:52:41.897000 | 1 | 10.244.1.6:8080 | example-app | default | example-app-787b775559-x4bsf | default/prometheus-agent | prom-agent-prometheus-agent-0 | example-app | v0.5.0 | | example-app | web | 2024-08-11 13:51:06.268000 | 1 | 10.244.4.5:8080 | example-app | default | example-app-787b775559-n6sqc | default/prometheus-agent | prom-agent-prometheus-agent-0 | example-app | v0.5.0 | | example-app | web | 2024-08-11 13:51:36.268000 | 1 | 10.244.4.5:8080 | example-app | default | example-app-787b775559-n6sqc | default/prometheus-agent | prom-agent-prometheus-agent-0 | example-app | v0.5.0 | | example-app | web | 2024-08-11 13:52:06.268000 | 1 | 10.244.4.5:8080 | example-app | default | example-app-787b775559-n6sqc | default/prometheus-agent | prom-agent-prometheus-agent-0 | example-app | v0.5.0 | | example-app | web | 2024-08-11 13:52:36.268000 | 1 | 10.244.4.5:8080 | example-app | default | example-app-787b775559-n6sqc | default/prometheus-agent | prom-agent-prometheus-agent-0 | example-app | v0.5.0 | | example-app | web | 2024-08-11 13:53:06.268000 | 1 | 10.244.4.5:8080 | example-app | default | example-app-787b775559-n6sqc | default/prometheus-agent | prom-agent-prometheus-agent-0 | example-app | v0.5.0 | | example-app | web | 2024-08-11 13:51:20.090000 | 1 | 10.244.2.5:8080 | example-app | default | example-app-787b775559-6bvz9 | default/prometheus-agent | prom-agent-prometheus-agent-0 | example-app | v0.5.0 | +-------------+----------+----------------------------+----------------+-----------------+-------------+-----------+------------------------------+--------------------------+-------------------------------+-------------+---------+ 10 rows in set (0.01 sec)数据写入成功 !
-
*使用 Grafana 渲染数据
我们可以直接跳过 Remote Read 直接对接 GreptimeDB,将其作为 Prometheus Datasource,设置对应的 URL 为:
http://my-greptimedb-standalone.default:4000/v1/prometheus/。